Posts

superquick CatHat!

Afbeelding
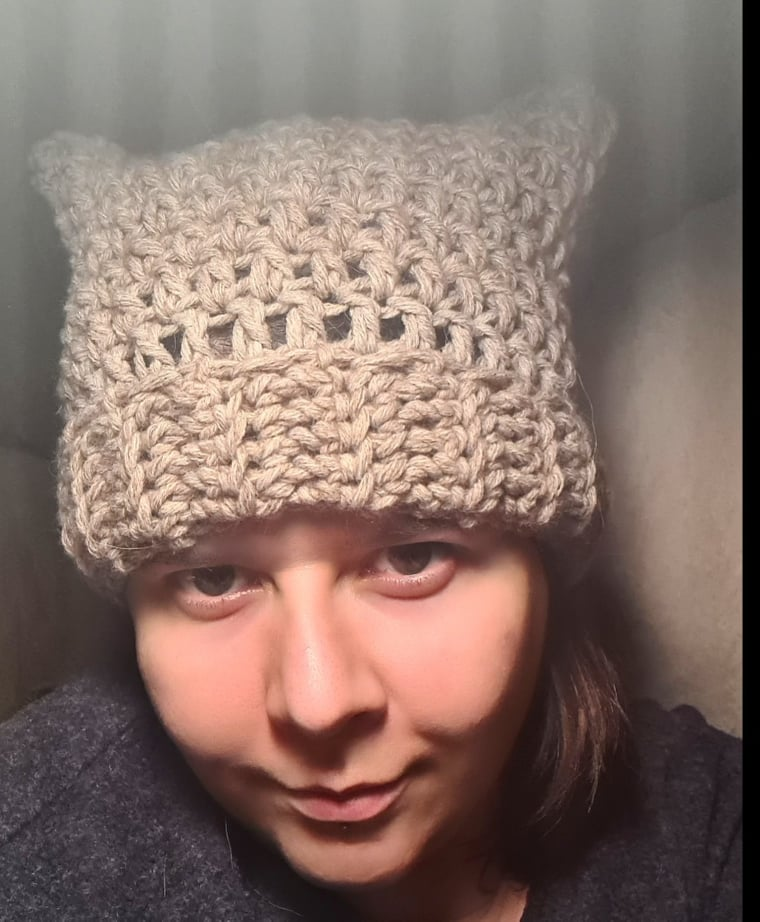
  Late for christmas gifts? This CatHat takes you 30 mins! (Maybe an hour for a absolute beginner) Materials used: I used a bulky yarn (5) and a 9mm hook.  Stitches used:  Ch: Chain  SC: Single Crochet  SC BLO: Single Crochet Back Loop Only Need to know:  Chain 1 or chain 2 at the beginning of a row does not count as a stitch.  Let's go! Pattern ribbing:  - Ch 11 - SC in the second chain from the hook and every stitch till the end (10), Ch 1, turn  - *SCBLO in every SC from previous row (10),    chain 1, turn* For the first and laat SC, go through both loops. This gives a much cleaner edge!      Repeat ** 36 times (or till the ribbing fit's your head, folded in half over the longest side) - Slip stitch the ends together and turn the ribbing sideways and turn the good side to the inside! We are working to the top now. At the end we will be folding this ribbing in half, take this into consideration when making your chain, if you want a big or small ribbing, adjust your numbe

Legwarmers *Simba*

Afbeelding
  This is a similar pattern to the bootcuffs, but here the pattern continues into adding a ribbed cuff on top.  Wool choice. I love using Merino extrafine, it's a medium/4 with a 5mm crochet hook. Starting notes:  DC = 2 chains SC = 1 chain Chain at the beginning of each round counts as first stitch unless otherwise stated.  Every round will be joined by a slip stitch.  Pattern is worked in the round. No turning needed. Extra information about the pattern: The size in the pattern is for adults. If you want to make this legwarmer in a different size: - for the pattern you have to use a multiple of 8 +1. - For the ribbing you have to use a multiple of 3. For example chain 48 works for an adult, chain 24 for a child works to for the entire pattern. You can use another multiple of 8, but for the ribbing the count won't end with 2 FPDC and 1 BPDC.  That's okay :) Stick to a multiple of 8 to make the pattern work though! Legwarmers are worked from bottom to top.  Let

*Windspinner Linda*

Afbeelding
Linda is the swedish word for "Wind". So that was pretty suitable for this project. I used regular cotton yarn with the advised hook. So you can take any cotton yarn you like.  Cotton is the best choice for a windspinner that's gonna be hanging outside, get wet and dry up, just to get wet again. I used 4 different colors. The pattern will say when I changed colors. Feel free to make your own design! (Pink) Chain 60. (Yellow) Row 1: 2 DC in every CH. (120) (Blue) Row 2: 2 DC in every DC (240) Optional: add an extra round to get a wider windspinner by adding; *1 DC, 2DC in the next  stitch* (360) (Orange) Row 3: 1 crab stitch in every DC (240 or 360) Add some beads add the bottom for weight, so the spinner can spin, obviously! Add a at the top if it's not spinning smooth. Have fun and enjoy your windspinner!

Bootcuffs *Indi*

Afbeelding
Yarn choice. Pattern testing elves loved using a color shifting yarn, 4/medium, with a 5mm crochet hook. Starting notes:  SC = Single Crochet = 1 chain at start round DC = Double Crochet = 2 chains at start round FPDC = Front Post Double Crochet BPDC = Back Post Double Crochet Chain at the beginning of each round counts as first stitch unless otherwise stated.  Every round will be joined by a slip stitch.  Pattern is worked in the round. No turning needed. Extra information about the pattern: The size in the pattern is for adults. If you want to make this bootcuffs in a different size: - for the pattern you have to use a multiple of 8 +1. - For the ribbing you have to use a multiple of 3. For example chain 48 works for an adult, chain 24 for a child works to for the entire pattern. You can use another multiple of 8, but for the ribbing the count won't end with 2 FPDC and 1 BPDC.  That's okay :) Stick to a multiple of 8 to make the pattern work though! Bootcuffs are worked from